Monday, October 1, 2012

The Big Dig: Fearsome Firehose > Tolerable Trickle

You may remember last Fall when I gave two very large Rhododendrons significant haircuts in preparation for a move this past Spring.  Well, mud season came on fast and furious this year so no heavy machinery was recommended in close-quarters with our possibly-piercable pieced-granite foundation.

And our friends who make a living with said heavy machinery Fat Cod were busy making hay while the sun was shining this summer.  So, as Fall rolled around and I made and off-handed query as to availability, I was somewhat taken aback when the answer was, "How about Friday?"

I immediately said, "Um, OK."  And the rest was, well, it's still happening, so not quite history, but there's lots to tell!  I don't have pics yet of our newly finished and landscaped dooryard featuring all sorts of reclaimed materials pillaged from deep holes and lost corners of woods and barns here at TOPH (coming soon!)  But, I will share a couple of the exciting experiments, achievements and milestones.
Here is the before picture of the large Rhodies, at-grade sills and negative grade on the west side of TOPH.  In anything but a passing shower, water regularly ran down the top of the parking area, across the dooryard and into the corner by the backdoor where it combined with the runoff from three roof directions and poured into the basement at a volume that was washing the mortar out from between the stones of our foundation.
And here is the pic taken just after the Rhodies were relocated to their new home in the south woods .  You can see where the grade has built up to the sills over the years.  And where the moss is growing on the siding where the bushes held moisture up against the house.
Here is a sneak peek at the new grading.  Although we had a pro from Fat Cod do the big digging , we were able to get in ourselves by hand and dig out up agains the foundation and reset the grade.  Stabilizing the drip edge with gravel and slate reclaimed from a mostly-overthatched patio was an afterthought, but proved to be key in the grand scheme.  We've had a couple of days of steady rain and the "breach" in our foundation (four feet below that sill cock by the window well) has turned from a firehouse volume to a trickle at the height of a downpour.  Huge improvement.  I know it sounds wierd, but we can live with trickle!  A river (well, maybe a small stream) runs through it.  That's par for the course in olds houses like this.
Here you can see a pile of reclaimed granite curbing (for water diversion) at the top of the slope and the beginning of a hardscaping and landscaping plan that had largely been in my head (as translated by Matt Gunn from Fat Cod with some handy pastry flour.)  We graded and shaped the walkway area by hand and then added nine tons of stone/gravel for good measure.  The walkway is not quite finished, but very, very close.   I've only rearranged the bricks four times... (Pics and details soon.)  
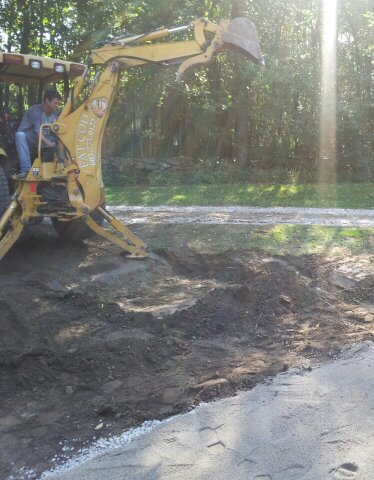
And then came the big dig.  It is our hope that this large rainwater collection area (now downhill from the house where the opposite slope used to be) will suffice to keep greater volumes of water away from the house and foundation, draining off naturally or with the help of suck-up plantings.  The alternative is some sort of high-volume French drain or piping system, but the distance that would need to be covered to reach the sufficient grade to achieve positive drainage would make that a much bigger dig, potentially disturbing working grade elsewhere around the house and property.  We will cross that bridge when (IF) we come to it.  In the meantime we could also supplement this rainwater collection area with a sump pump and hose if it does not drain quickly enough, but so far we have seen it drain more than 2 inches and hour.  And it has a capacity of about 2,000 gallons by my estimation.  Here's hopin'!

 That's all for now.  More pics and details on repurposed treasures when walkway is (really) set and the grass is showing and the base plantings are in.  There is even be some bawdiness in the finishes if you are of that mindset.


Sunday, September 30, 2012

The One That Got Away: Over-built & Under-appreciated


Three layers of leave-behinds, the oldest
 of which was hand-painted.
So, about that floor...  My son's room is still not finished.  And it's not just my inept wallpaper removal that's holding it up.  Although, for the record, the last three people to do wallpaper removal in that room weren't all that awesome either.  There were all sorts of leave-behinds under there.  Layers upon layers of fun!

Speaking of layers, the floor in there was faux wood linoleum.  In a house full of ruined and wretched hardwood floors, what could be so bad that you had to cover it with faux wood linoleum?

One of the daughters of the previous owners recalled to us that there was carpet in there at one time.  And by other evidence in the house, there had been some ill-behaved dogs.   Hmmm.  Well, we painted the floor in my daughter's room to cover old ink and water stains.  That looks pretty cool, so we could always do that, right?  Maybe I'll just peel up a corner and see.

Just peeling up a little bit... And there's a subfloor.  Hmmm.

More tools required.  Now, the guts to go
 beyond the point of no return.

Yep, there's a maple hardwood floor under there.
So, there's a maple floor.  Same as in my daughter's room.  No apparent damage in this tiny little corner.     But.  There's always a but.  Whoever decided this floor needed covering did so in an era when linoleum backing adhesives were very, very good.  And whoever installed this floor also decided that staples are cheap.  The linoleum-armored subfloor is attached to the maple floor at a project-rage rate of 37.4 staples per square foot.  And these are not just any staple, they are 1.25"-long staples with super-tiny heads.

In short, removing this cheap-ass, installed-in-a-day floor is very hard work.  And it's still not done.  I, again, had to enlist the help of hubby to help me rip up the linoleum-enforced, staple-fortified plywood as I was honestly not strong enough.  And, now that it's up, the staples are a back-breaking remainder.  Removing the staples is sit-on-the-floor contortion antics at their worst.  And the staples are finicky.  Twist or wiggle them too much and the head breaks, leaving un-grabbable sharp thingies.  Just what I need, a bed of tiny spikes for my little one's tootsies to walk on.  Tom Thumb singing Tip Toe Through the Tulips Iron Maiden-style.  But I digress...

The priming and painting (and painting and painting) is progressing in there, but it's no wonder there has been a procrastination factor on the floor.

Still baffled as to why the hardwood was covered in the first place.  There is a dark stain and some minor mold on the floor near the former fireplace -- likely new from condensation off the chimney where our newly efficient, awesome furnace exhausts into and as-yet unlined flue (short list).  And there are a couple of totally fixable water spots along the outside wall from old roof/ice damn leaks.  But, seriously, this floor is totally OK.

It's times like these when you really wonder what people were thinking.  Under-appreciated maple hardwood masked by completely overbuilt subfloor topped off with faux wood linoleum. Does not compute.  At all.

I know, I'm just bitter about the staples.  And we are headed into month three of my three-week project.  And my poor soon is still sleeping over in the bunk room.  This room just has to get finished before heat is requisite as we don't usually keep the Tavern/Bunk zone warmer than 58 in the Winter.  Can you say son-sicle?

On a side note, said son is currently obsessed with The Wordsuckeruppernator (brainchild of The Electric Company) on PBSKids.org.  And he wants to build/invent one of these contraptions himself.  Wonder if  this clever almost-six year-old could come up with a Stupidstaplesuckeruppernator?

The One That Got Away: Sticky Bits & Draft Dodging

When you are living in an old house, the norm is for projects to take longer, cost more, and generally become way more involved than you anticipated.  We've had plenty of that here at TOPH, but I must say there is one that is d-r-a-g-g-i-n-g.  My poor son's room is still not finished.

Last year, I jumped right in on my daughter's room.  The wallpaper was a willing participant in the removal process and, aside from the month of humidity we managed to bring with us from Annapolis, which made paint drying a bit of an issue, her room was done in a reasonable period of time.  My son's room was slated for this past Summer.  Specifically, I was going to get it done with all of my free time when they were at day camp for four weeks.  Yea, right.

Before Pics of My Son's Room
Suspect Closed-Up Fireplace Here

Some Old Water Damage
Some Failed Lath & Plaster Marriages
First, I needed to get in the right mindset for the project.  So, I flew to Maryland and went sailing for a long weekend (Thank you, L'Outrage peeps!), which turned into a week due to last minute while-I'm-here business meeting and the monster of all flight delays which resulted in driving all the way home in a shared rental car (shades of John Candy and his polka band in Home Alone)...  

The bits and bits and bits...
Anyway, when I finally got back, I had three weeks to finish one room.  Doable, right?

Well, the wallpaper in his room would not come off.  At all.  Except in little itsy-bitsy bits.  I tried water and vinegar and orange infused vinegar.  Nothing worked.

I went to Lowe's to buy a steamer and try that, but instead was led astray by a know-it-all paint-counter-chick at Lowe's.  She offered up a "trick" her father used to swear by.  He swore about it all right.  I painted over one entire wall of already-permanently-adhered wallpaper with KILZ on the theory that it would somehow bond with the paper and react with paste and basically fall off the walls.  Not.  I ended up with still-permanently-adhered wallpaper, which was then impermeable to liquid, which,  according to my husband (aka The Wallpaper Whisperer), was the trick all along.

The Wallpaper Whisperer
He took pity on me one afternoon and stripped the other three walls of the room with hot water and a dull putty knife.  Which, of course, left me with "that" wall.  Eight days later, with help from my mom, "that wall" was finally clear of bits of paper along with several chunks of the plaster wall that decided to go for the ride.  


Really.  If we just ripped off all the
 plaster and painted the lath,
 wouldn't that look cool?
  OK, so it would have
 been a bit breezy...
Midway through, I was absolutely convinced I could make painted lath look really good in a rustic kind of way.  Hubby was morally opposed to that little bit of avoidance-DIY decorating nonsense. (I still think I could have made that look good.)


Anyway, enough about the wallpaper.  It's over, along with six good-sized tubs of DAP Fast and Final spackle-product (like cheese product?)  That stuff is like "Wall Meringue" -- super light and perfect for filling in the spaces in crusty, crumbly surfaces that won't hold up to much sanding.  So, although the texture of my son's walls, like his sister's, is akin to a Mexican Mission, they are free of cracks and holes.  Draft dodging achieved!


Now, I wonder what's under that faux wood linoleum floor?

PS Yep, there was a fireplace there.